Vintage DIY Cake Stands For Your Wedding Table

Vintage DIY Cake Stands For Your Wedding Table
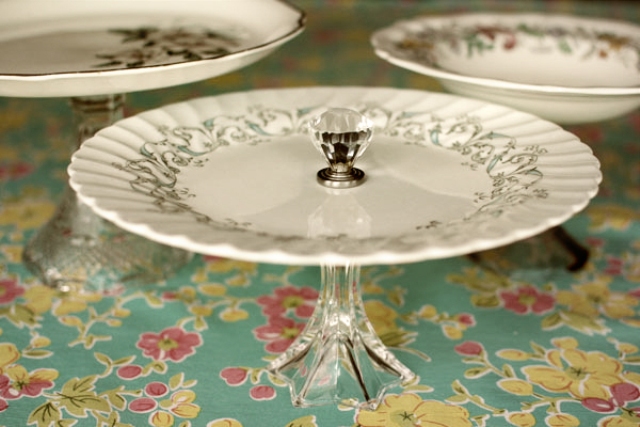
It isn’t difficult to create cake stands yourself, so let’s try! Then you can place gorgeous cakes or cute cupcakes on them. You’ll need a vintage plate, a glass candlestick, a crystal drawer pull, epoxy glue, ruler, sharpie, popsicle stick, Q-tip and something to mix your epoxy in. Find the half way point on the back... 
MORE PICTURES

Graceful Short DIY Polka Dot Veil

Graceful Short DIY Polka Dot Veil
Creating your own veil independently is one of the best ways to add something personal to your wedding. You’ll need tulle, thread, needle, scissors, acrylic paint, pencil and wax paper. First cover your workstation with wax paper and tape the corners to secure. Now spread your tulle over the wax paper and secure as well.... 
MORE PICTURES

Cool DIY Metallic Chalkboard Table Number

Cool DIY Metallic Chalkboard Table Number
Today we have a simple but stylish table number idea for you, so let’s repeat it! You’ll need simple wood boxes, white paint or any coordinating paint, gold acrylic paint, plaster, medium paint brush or sponge brush, stencil of desired shape and chalk or chalk pen. First mix two parts plaster to one part paint... 
MORE PICTURES

Charming DIY Wedding Braided Chignon Hairstyle

Charming DIY Wedding Braided Chignon Hairstyle
All those gorgeous hairstyles on Pinterest seem so sophisticated and difficult to make! However, in fact some of them are much easier than we think. For example, this romantic and timelessly elegant braided chignon you can totally handle on your own or with a help of your best girlfriend. It’s perfect for pretty much any... 
MORE PICTURES

Classy DIY Wax Seal Wedding Escort Cards

Classy DIY Wax Seal Wedding Escort Cards
Wax stamps were usually used for sealing the envelopes and adding a classy touch to them. Right now it may be not this popular but still common to apply the seals to correspondence and even wedding escort cards, like in today’s tutorial. They look so unique and beautiful, don’t they? You can recreate them yourself,... 
MORE PICTURES

Touching DIY Guestbook Ring Pillow

Touching DIY Guestbook Ring Pillow
It’s a very easy-to-make project, and we are sure that you’ll like the result! You’ll need any white ring pillow, 10″ of satin ribbon, approximately 5″ of embroidery floss, embroidery needle, scissors, 1 piece of 8.5 x 11″ iron-on transfer paper, iron, 1 piece of off white cotton fabric that is 3 x as wide... 
MORE PICTURES

Geometric DIY Papercut Backdrop For A Wedding Or Bridal Shower

Geometric DIY Papercut Backdrop For A Wedding Or Bridal Shower
This super cool geometric backdrop is great for jazzing up the space where you celebrate your bridal shower or even wedding. It’ll take like an hour to make by yourself and then you can hang it over a bar/dessert station or somewhere else you like. Here’s what you need exactly to begin: 36” roll of... 
MORE PICTURES

Original DIY Watercolor Wash Place Cards

Original DIY Watercolor Wash Place Cards
For realizing this project you will need almost 8 hours and a lot of patience. But the result is worth it! The supplies are 90 3.5×6-inch pieces of heavy watercolor paper cut, pan of assorted watercolors, 1 tbsp acrylic paint in an accent color for splattering, 2 tbsp table salt, ink, watercolor or gouache of your... 
MORE PICTURES

DIY Charms To Personalize Your Wedding Bouquet

DIY Charms To Personalize Your Wedding Bouquet
We are sure that this accessory will make your bridal bouquet more personal! Just think over what you’ll write on these charms (wedding date, your names, etc.) and let’s create them! You’ll need oven bake clay, circle cookie cutter, acrylic rolling pin and alphabet rubber stamps. First roll out the clay to a ¼” even thickness.... 
MORE PICTURES

Gentle DIY Watercolor Tags For Wedding Favors

Gentle DIY Watercolor Tags For Wedding Favors
Starting to prepare all décor elements for your wedding? You can try this technique and make drink tags, escort cards or favor labels. You will need watercolor paints, paper tags, a white crayon, a paint brush and water. Write in your details on the paper tag with a white crayon. Be sure to press firmly... 
MORE PICTURES